The Land Down Under

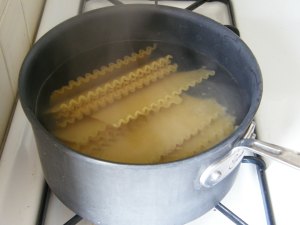
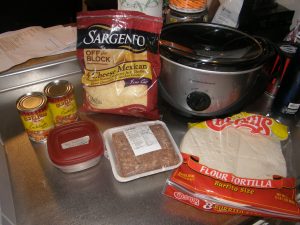
So after all this food, it’s time for some fun!!
My husband and I recently took a vacation on a whim down to Australia.  Living in Okinawa, Japan, we figured what better time to go while we still have no kids, don’t have a crazy time difference and have a little extra vacation time at work.  I’ve noticed in talking to many different people that Australia is on almost everyone’s dream list of places to go and for good reason!  There is so much to do and see while you’re there that I would highly suggest taking more than the 4 days we did to see it!
After a loooooong flight to the land down under, we finally made it and got in the first cab we could find to get to our hotel, the Holiday Inn in the Rocks.  Even though we got there at 9 in the morning, they already had our room ready for us so we spent a little while recuperating from our flight before heading out to explore
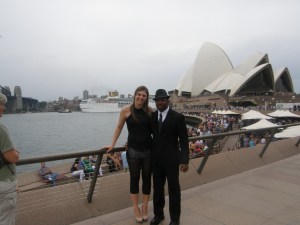
Our first thing to do on the agenda was to see the Sydney Opera House.  You always see it in pictures but you never really feel as amazed as when you see it in person.  Our hotel was only maybe a 10 minute walk to the Opera House so off we went and here’s what we saw
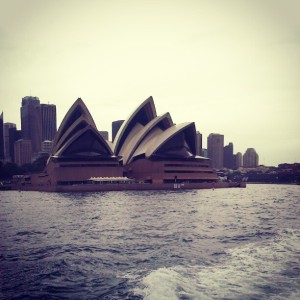
32346_562268333728_1328760152_n
It was amazing!
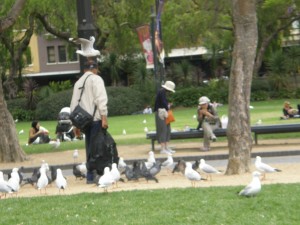
We spent the rest of the day walking around Circular Quay and stopping in the touristy shops and eating, you guessed it, fish and chips (which are amazing by the way!).  As well as trying to avoid the pigeons! There were so many!! And apparently they didn’t care where they landed because this guy was walking around with one on his head…
OLYMPUS DIGITAL CAMERA
Still feeling tuckered out from our flight, we hit the hay early because the next day was bound to be more eventful than the 1st.
So day 2 in Sydney and we started out at Paddy Markets.  If you’re looking for small knick nacks to give to people back home or even some cool souvenirs for yourself, you definitely need to stop by here!
OLYMPUS DIGITAL CAMERA
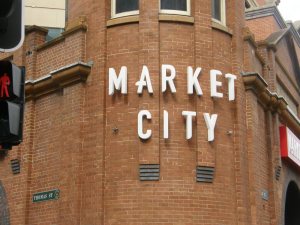
Located in Chinatown (I swear there’s one everywhere!), they have probably the cheapest prices for souvenirs anywhere in Sydney.  They are open Wednesday-Monday from 9-5.  Just make sure you go onto the 1st floor and not into the mall on top of the markets, it’s not near as cool.
With our pockets considerably lighter, you know, because we have so many good friends that we needed to bring stuff back for, we headed off to our next stop: Taronga Zoo.
OLYMPUS DIGITAL CAMERA
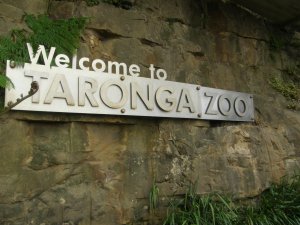
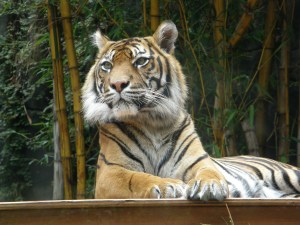
Now I’ve been to quite a few zoos in my life living in the midwest, the south, Alaska, and Japan and this zoo was one of the best I’ve been in! They had tons of animals and shows to see.  We could have spent hours in here reading information, talking to zookeepers (with their awesome accents!) or walking around and we did spend right about 2 hours taking lots of pictures (like this one that I’m so proud of!) and walking off our fish and chips from the day before.
OLYMPUS DIGITAL CAMERA
In the evening, we decided that it wasn’t enough just to SEE the Opera House, we wanted to see a show at the Opera House so we bought tickets to Swan Lake.  Now, ballet isn’t really my thing even though it was an amazing show but it was nice to get all dressed up, see a show and have a night out on the town.  If you can afford it, I would definitely recommend the experience!
OLYMPUS DIGITAL CAMERA
Falling into bed at the end of the second day, we hoped to get enough sleep to take on the 3rd fun filled, time packed day!
So rise and shine!! Onto day 3 –
We  booked a tour with Activity Tours and I’m so glad we did!  Our bus driver’s name was Steve and he had a great sense of humor and was full of information.
Our first stop was Featherdale Wildlife Park.
OLYMPUS DIGITAL CAMERA
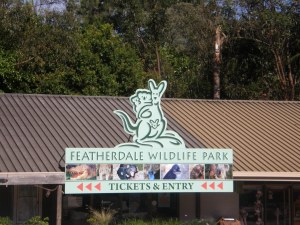
This place is definitely one of my most recommend places, why you ask, well, because it’s awesome!! Where else can you take pictures with koalas, feed wallabys and kangaroos and see may other native Australian animals!
So off we went to explore! First things first – the koalas!
We got our picture taken with one and it felt like it had a super soft afro!
OLYMPUS DIGITAL CAMERA
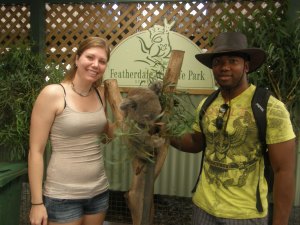
We were thrilled and I’m sure it was content just eating it’s bamboo.
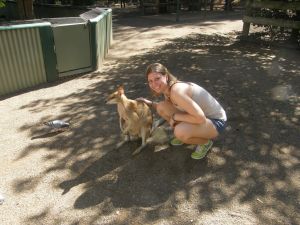
Then, off to feed the wallabys.  I didn’t know the difference between a wallaby and a kangaroo before and I still don’t think I could tell you exactly but I do know wallabys are so much cuter! (And they like to eat ice cream cones!)
OLYMPUS DIGITAL CAMERA
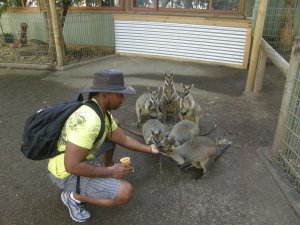
See what did I tell you! Now what you don’t see is one of these wallabys stealing the cone right out from my hubbys hand and jumping away with it! They warn you about it but the look of shock was priceless!
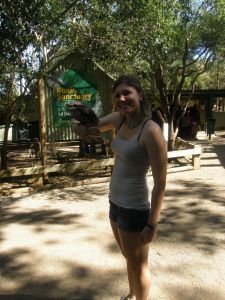
They also let you hold other animals like snakes and birds like this one:
OLYMPUS DIGITAL CAMERA
And then onto what we thought was going to be the main attraction (before we saw the adorable wallabys that is) kangaroos!
All the kagaroos are just in a fenced off area that you can walk around in, walk straight up to them, feed them, take pictures with them and hopefully not get pecked at by an emu.
OLYMPUS DIGITAL CAMERA
See what I mean, wallbys are so much cuter!
We wandered around the park for awhile and saw wombats, dingoes, peacocks, reptiles, and many more animals.  The best though was one of the parrots we walked by, we were talking and not paying any attention and out of nowhere someone said hello.  We were really confused until we said hello and it said it again! We looked up and there was a parrot sitting there looking at us.  It was awesome!
When we were finished here, we were onto the second part of our tour, the Blue Mountains.
OLYMPUS DIGITAL CAMERA
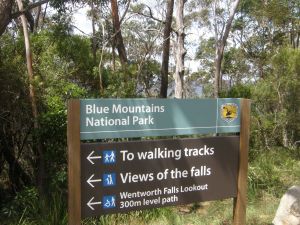
Now when I say beautiful, I think it is an understatement.  It was gorgeous! The day we picked to go was perfectly clear and the view was breathtaking.
OLYMPUS DIGITAL CAMERA
We were able to hike around a little bit and take lots of pictures! Until our batteries died in our camera… I definitely need to remember to plan ahead better next time!
After the Blue Mountains, we went to a small village to eat lunch and then off to see the 3 sisters rock formations and ride the steepest railway in the world!OLYMPUS DIGITAL CAMERA
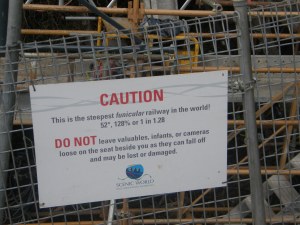
It’s a good thing we had everything in our bags because we definitely wouldn’t want to lose anything, especially an infant!
On our way back from the 3 sisters we stopped at the Olympic Village and then took a ferry ride back into Sydney.
It was definitely one of the best tours I’ve been on! I highly recommend them!
Not having much energy left, we stopped at a little Italian place to eat dinner behind our hotel that had some of the best Italian food I’ve ever eaten! And then headed to bed.
Our last day in Sydney we were off on another tour but this one was a Hop-on Hop-off tour where we rode on a bus with commentary and when we found something we wanted to explore more, we got off at the next stop and walked around until we wanted to get back on and see some more.  I booked our tickets online so we were able to include a behind the scenes tour of the Opera House, a ride up to the Tower Eye (the highest spot in Sydney), a ride on the Monorail and a ferry ride.  It was a great deal! We rode around all day until they kicked us off the bus at the end of the day when they were done with tours.  One day may not have been enough time to see everything around the Sydney area that we wanted to see though.  Next time we’ll know to plan for more time.
End of day four and we were pooped yet again so we retired early since we had to be up at the crack of dawn to catch our flight back to Japan.
We had an amazing time in Sydney and if you are ever able, please go! It is a great experience unlike any other and one that you’ll remember for the rest of your life! (And if you have a bad memory, just take lots of pictures, that’s what I do!)
Until our next adventure!

Links:

Home


http://www.holidayinn.com/hotels/us/en/sydney/sydgs/hoteldetail
http://www.city-sightseeing.com/tours/australia/sydney.htm#tourlandingposition

HOME

Lasagna Love

You may or may not know this about me but I love Italian food! And not just a little bit, but a lot, as in I could eat it every meal of every day.  Maybe it’s the pasta or pizza or just plain carbs, who knows, but it’s my favorite.  That’s why when I was given this recipe, I thought I needed to make it STAT!
Unfortunately, I needed to go to the store to get some of the items first.  I try not to keep lots of pasta and sauces at home or I will make it for every meal… not necessarily a bad thing just not so good for my waistline.

So for this recipe you will need:
2 lbs hamburger
1 lb mild or hot Italian sausage depending on your preference
Half a package of lasagna noodles
1 large jar of your choice of spaghetti sauce (or just a large can of tomato sauce)
2 Tbsp chopped dried onions
Garlic Powder
Onion Powder
Italian Seasoning
1-2 lb bag Cheddar Cheese
1-2 lb bag Colby Jack Cheese
Optional – Cottage Cheese 1 1/2-2 cups

First things first, preheat your oven to 350 degrees.
Now grab a pot to boil some water for your noodles.  To make it easier,  I broke 12 of them in half so I could use a smaller pan.  You shouldn’t need more than 10 noodles but I always make 2-3 extra in case they break or turn out funny.  Wait for your water to boil and then cook your noodles according to your package directions, mine were about 12 minutes.  Then drain and let them cool a little so you can pick them up (or if you’re impatient like me, use a pair of tongs to seperate them and pick them up).
NOTE: Make sure you stir them once or twice or they’ll stick together and when you try to peel them apart, they’re tear and you won’t be able to layer them very well!
OLYMPUS DIGITAL CAMERA
As you’re waiting for your water to boil and your noodles to cook, start browning your hamburger and Italian sausage.  You can cook them in batches or all together if your pan is big enough.  Once it’s all browned, drain the grease off.
OLYMPUS DIGITAL CAMERA
Now this pan wasn’t big enough to add the sauce and not over flow so I transferred the meat to my big soup pot and then poured the tomato sauce over it.  One jar is usually enough but if you want to make a little more sauce, just add some more.  Add your spices to your meat and sauce mixer.  I used about 1/2 of the McCormick Italian Seasoning .62 oz bottle or about 4-5 Tbsp, 1 1/2 Tbsp garlic powder, 1 Tbsp onion powder and 2 Tbsp dried onions but it’s completely up to you.  Then, bring your sauce to a boil.  Once it starts to boil, turn your burner to low and let it simmer about 20 minutes.  Make sure you stir is occasionally.  Not only does this help make sure it doesn’t burn but it also gives you a chance to taste it to see if it needs more spices.  If it’s to spicy, you can add more tomato sauce.  If it’s not spicy enough, add some spices.  And if it’s to tomatoy, add a little brown sugar, it’s random I know, but it works to make it not so tomato tasting!
I forgot to take a picture of my pot of simmering goodness… I think I was daydreaming about Italy or something.
After your done simmering, if you’re going to use cottage cheese (which I recommend, I just forgot to get some from the store), remove your pan from the heat and add it to your sauce.
And now that your noodles are cooked and drained, your meat sauce perfect for your taste, and your cheese ready to become ooey gooey, you can start your layering.
Start with your noodles in a greased 9×13 pan.  I layered mine like this so I didn’t have a gap in the middle:
OLYMPUS DIGITAL CAMERA
And yes, there is already a layer under there, I told you I was excited to make this and forgot I was supposed to be taking pictures…
After your pasta, spread on your meat sauce.
OLYMPUS DIGITAL CAMERA
Then your cheese.  Now it’s completely up to you how much cheese you put on.  I really like cheese so I used about 1 1/2 -2 cups of cheese per layer.  You can alternate layers of cheddar and colby jack or combine them each layer like so:

OLYMPUS DIGITAL CAMERA
Continue to layer until you’ve reached the top.  Usually I get about 3 layers out of it.  Just make sure to end with your cheese!
Now that your oven is all nice and preheated, bake your lasagna uncovered for 30 minutes and you should get something that looks like this:
OLYMPUS DIGITAL CAMERA
Doesn’t it look delicious?? And it smelled so good!
You know you want a close up of all the cheesy goodness so just for you, I got a picture –
OLYMPUS DIGITAL CAMERA
Yummmmmm.
You may want to let it sit for a little bit, maybe 10-15 minutes to let your sauce settle a little or it may still be a little runny.  But if you’re going to taste and not looks, dig in!
OLYMPUS DIGITAL CAMERA
It’s ridiculously hot though (as proof by the steam coming from the top!) so be careful!
And if you’re really in the carb eating, I mean, the full Italian dinner mode, you can serve it with some garlic bread.
OLYMPUS DIGITAL CAMERA
AND if you want to be healthier, you can add a salad 🙂
I would say this recipe was a definite success and one I will surely be making again!!

Recipe Followers vs Wing it People

You know, there was a time when I hated the kitchen and everything in it (except the food of course).
I think my turning point from hate to love was when I threw a huge stink about the pot of rice I was making when I was about 17 (surprise, surprise, teenagers throwing tantrums, who would’ve thought…).  I don’t remember what exactly was wrong with the rice but I do remember storming out of the kitchen so frustrated that I had all but vowed to never return.  (Good thing I didn’t keep that vow!)
Since this incident did not occur at my house but instead at the house of the kids I babysat, I remember their mom running after me and telling me I needed to get back in the kitchen, now, right now, and something about if you fall off a horse the only way to conquer your fear is to get right back on.  We had a pretty close relationship which is the only reason I didn’t take off but instead, returned to the kitchen and finished my so-so pot of rice.
Now, to the point of this story, that pot of rice went with our dinner of peppered steak.  The peppered steak was made from scratch with no recipe and I was (and still am) a little envious that some people can come up with recipes on the fly and others (like me) feel the need to follow recipes.  Every once in awhile, I try to hop the line between the recipe followers and the wing it people to see if I can make my own recipe.  And this morning… I felt like wingin’ it.
I had been craving enchiladas for about 2 weeks now and I’m not talking the Taco Bell kind (I know because I tried them to see if I could get the craving to go away but it didn’t work).  One of our friends had a birthday party last weekend and she made enchiladas for everyone and they were delicious and filled my craving perfectly!  But I must not have eaten enough of them because I wanted more!  More!! MORE!!! So I decided, I too wanted to learn to make enchiladas but my challenge was that I wanted to make them from scratch with – wait for it – no recipe!  I was going to be a wing it person and not a recipe follower for the day.
For my enchiladas, I used:
A crockpot because it’s a crockpot recipe!
1 lb ground beef
2 Tbsp homemade taco seasoning or one packet of taco seasoning
Water
6 tortillas
cheese
2 cans enchilada sauce
Toppings of choice
OLYMPUS DIGITAL CAMERA
First, brown your hamburger and drain the grease.  Add about 1/4 cup water to your meat plus 2 Tbsp of your homemade taco seasoning or  one taco packet and cook 2-3 minutes or until most of the water is gone.
Sidenote:
I found this taco seasoning recipe on Pintrest and I love it! It tastes just like regular taco seasoning and doesn’t have any of the preservatives.
You’ll need:
1 Tbsp chili powder
1 Tbsp ground cumin
1 Tbsp garlic powder
1 Tbsp onion powder
1/4-1/2 Tbsp crushed red pepper
Mix is all together and you’ll get something like this:
OLYMPUS DIGITAL CAMERA
Just make sure you store it in an airtight container so it will keep longer.
Back to the enchiladas…
Get out your tortillas and cheese.  For each tortilla, put a little over 1/4 cup meat, a palm full of cheese (or however much cheese you want to add) and any other topping that can get warm and still taste good like refried beans.  The only reason I didn’t add any refried beans to mine was because I didn’t have any and I was, you know, trying to wing it.
OLYMPUS DIGITAL CAMERA
If you don’t know how to fold an enchilada Angel style, I’m going to tell you.  First fold the top down til it just covers the meat part, then fold the two sides in over the top part.  Then fold your bottom part up over your sides and flip it over so it looks like this.
OLYMPUS DIGITAL CAMERA
And wala you’re now an expect Angel style tortilla folder, congratulations 🙂
Since I made this a slow cooker recipe, layer your enchiladas in your crockpot.  Mine fit two at a time so I stacked them 3 high turning each row about 45 degrees.
OLYMPUS DIGITAL CAMERA
Now, pour your enchilada sauce over the top of everything.  You can choose how much sauce you want.  I used about one and a half cans.  If you like more and are a bit saucy, use two cans or if you like less and are more reserved, use only one but I think one and a half turned out just about right.
OLYMPUS DIGITAL CAMERA
Let it cook on LOW for about 4 hours or until your cheese is melted and it looks so delicious you can’t stand it.
OLYMPUS DIGITAL CAMERA
Then take them out and enjoy fulfilling your craving for enchiladas!
Every homemade recipe must have a little trial and error so here was my error – I cooked mine for about 8 hours.  They still tasted amazing but they started to stick together and were hard to unstick without ripping into them.
So only the top layer had enchiladas that looked like this
OLYMPUS DIGITAL CAMERA
All the rest were kind of like enchilada casserole with a mix of meat, cheese, tortilla and sauce.  Don’t get me wrong, they were still delicious, just not so great to look at.
Now is when you top your enchilada with the toppings of your choice whether it’s lettuce, salsa, sour cream, more cheese or just some extra enchilada sauce.  I really just wanted to try mine so I didn’t add anything else to it and it was delicious!
And I can chalk this up to one (mostly) successful recipe as a wing it person!
Success!

Grocery Store Mini Cheesecake Recipe

Whenever I go to the grocery store I stop by almost every item that I know that has recipes on it like chocolate chip packages, soup cans, and every little recipe card I can find! Sometimes those recipes turn out okay and sometimes they turn out to be amazing!
Now I have always been a fan of chocolate with just about anything and the recipe that I found this past weekend was chocolate and peppermint.  With all my Christmas baking that I was about to do, I thought it would fit right in!
So without further adieu:
Peppermint Chocolate Mini Cheesecakes – makes 24 mini cheesecakes but you may want to double (or triple!) this recipe
You’ll need:
3 graham crackers
1/2 cup pecans, toasted (optional)
2 Tbsp butter, melted
1/3 cup Ghirardelli 60% Bittersweet Chocolate Chips
1 3.5 oz Ghirardelli Pepeprmint Bark Baking Bar, chopped
8 oz cream cheese, at room temperature
1/3 cup sugar
1 large egg
1/4 cup whipping cream
mini muffin liners
OLYMPUS DIGITAL CAMERA
Before I start any recipe that involves the oven, I always turn it on! Mostly because I’m a little impatient and once I’m ready to put my goodies in the oven, I really don’t like waiting for it to heat up! So to begin with, preheat your oven to 350 degrees.
First, work on the crust.  I put the graham crackers in a bag and hit it repeatedly with my meat tenderizer.  Maybe a little ghetto yes but not only are meat tenderizers great for chopping stuff up but also to help let off a little steam sometimes, especially when it’s for a delicious cause! Or if you don’t have any steam to let off or just want a little less mess, you can always put them in a food processor and chop them up fine that way.
Once you have your golden crumbs, put them in a bowl with your melted butter and mix together.  It should look like this only with a little more, I got so excited that I forgot to take the picture til I was halfway through putting the mixture into the cups… oops.

OLYMPUS DIGITAL CAMERA
Put your mini muffin liners in your mini muffin pan and spoon one teaspoon of the mixture into each liner and press it into the bottom.  I found the easiest way to portion it was to use a teaspoon.
OLYMPUS DIGITAL CAMERA
Bake your crusts for 8 minutes or until golden brown.  Then let them cool.
While you’re waiting on your crusts to bake and cool, start your filling.
With a mixer, beat your cream cheese until smooth or about 1 minute on high.  Add sugar and beat until smooth again and then add your egg and beat again.  On low speed stir in the cream.  It should be nice and creamy.  If it has chunks it in you didn’t beat your cream cheese smooth enough and you may have to take a scraper and push the chunks onto the side of your bowl to smooth them out.
OLYMPUS DIGITAL CAMERA
Then put your chocolate and 1/3 of the peppermint bark baking bar (make sure it’s chopped! you can use the meat tenderizer method or a food processor for this too) in a microwave safe bowl.  I added about a teaspoon of oil to it mostly because I haven’t had much luck with microwaving chocolate, usually it comes out in a burnt glob but adding a little oil makes it nice and creamy like it should be.  Or you can try to use a double boiler which I also have not had much success with (unless you count the lemon curd I made right after this recipe which turned out amazing!).
OLYMPUS DIGITAL CAMERA
Melt it for about 30 second then take it out and stir it.  You may have to microwave it a little more but make sure your chocolate isn’t all the way melted and stir it all together to melt it the rest of the way so it’s super creamy!
Then add half of the chocolate mixture to your cream cheese mixture and mix until combined.  Now add the other half.  Anything that doesn’t get scraped into the cream cheese mix, make sure to taste! Even if you have to use your finger to scrape your bowl, it is delicious and so worth it!
OLYMPUS DIGITAL CAMERA
If you have a small ice cream scoop like the kind from pampered chef, now is a great time to use it! Or you can just use a Tablespoon to fill up each cup.  I filled mine all the way to the top.
OLYMPUS DIGITAL CAMERA
Remember the whole impatient thing… this picture was taken right after I put them in the oven because I was to impatient to wait until I changed the batteries in my camera.  I mean that’s a whole 30 seconds that they could be baking instead!
Bake the cheesecakes until set about 10-12 minutes.
When they come out, they should look like this:
OLYMPUS DIGITAL CAMERA
Let them cool about 15 minutes and then refrigerate at least 4 hours.   I got distracted by all my other baking that mine were in there about 6 hours before I remembered them! After your 4 hour (or 6 hour!) wait, then remove them from your pans.  You probably could take them out right after they come out of the oven but they might fall a little and not be so pretty so I waited to remove them.
And now, you can top them with whipped cream and some of the remaining peppermint bark that you chopped up for a beautiful looking mini cheesecake! (Sorry about the blurry picture, my camera skills need some work)
OLYMPUS DIGITAL CAMERA
It’s been awhile since I’ve been to the Cheesecake Factory but I think that these are better than their chocolate cheesecake! It was so good!
Since I only made 24 and I was sending them to work with my husband, it was so hard to only eat one!
OLYMPUS DIGITAL CAMERA
And there you have it, recipes from the grocery store can be amazing! Especially if they involve chocolate and peppermint!

Homemade Frosting

A couple years ago I walked into a Michaels in Anchorage, Alaska.  The first thing I saw was an aisle full of the most awesome baking gadgets you could think of and off my mind went to the majestic baked goods that I could see in my future! (I’m not sure if it’s a girl thing or just me but when I have an idea I like to play it all the way out and then decide it it’s worth it.)  As I was daydreaming and walking down the aisle, I happened upon a board that had Michaels’ classes that they offered and 1st on the list was cake decorating basics.

Now it was never my life long dream to become a cake decorator but I remember decorating cookies and treats with my family and all the fun that we used to have doing it, so I thought I would give it a shot.  I mean really, what did I have to lose??  So I signed up for the class and started the next week.  I’ll spare you all the details of the hours I spent baking and decorating (though I’m sure you’d love to hear about it right?) and skip to what this post is about… FROSTING!

My instructor for the class gave us a frosting recipe that she had tweaked from the normal Wilton recipe they provide for the class and I wanted to share her deliciously tweaked recipe with you!

To make the frosting recipe, you’ll need:
1 lb powdered sugar
4 oz cream cheese
2/3 cup crisco
1/4 tsp clear butter flavoring
1/4 tsp clear almond flavoring
1/2 tsp clear vanilla flavoring
1 Tbsp meringue powder
1-1 1/2 Tbsp milk

OLYMPUS DIGITAL CAMERA

Now you may be asking, why clear flavorings??? Well if you want white frosting, they have to be clear otherwise your frosting may turn a weird shade of grayish brown which may taste amazing but isn’t so nice to look at.  Also, if your frosting is white, it’s easier to color.

So first things first – you will need to cream together the crisco and cream cheese with your choice of mixer (mine is the Kitchaid) or if you’re in a real get-r-done kind of mood, you can always try this by hand (I’ve never been that gungho so I have no idea how long it would take).  Once you mix them together it may look a little lumpy and that’s okay.  I normally let my mixer run about 1-2 minutes.  You can scrape your bowl if you feel you need to but it’s not necessary.

After this step, don’t eat it, I tried it today just to see and crisco and cream cheese, it turns out, are not so tasty together, but don’t worry, it gets a million times better.

Then after it’s nice and creamed together, add your flavorings, meringue powder and milk and mix again.

Once that’s all mixed together, maybe another minute or two, stop your mixer and add your powdered sugar.  If you have a scale and can measure out your powdered sugar or approximate half the bag or, like me, just double the recipe and use a whole bag to make it easy.

Please remember to start your mixer off slowly, or you may wind up with a nasty powdery mess in your nice clean kitchen.  Your kitchen is clean too right?? Yeah mine is umm…  well… it starts off clean.

Once you mix all your ingredients, your frosting should look something like this.

OLYMPUS DIGITAL CAMERA

Now based on what you’re trying to do with the frosting will determine what you add next.  If you want to eat the frosting with a spoon this consistency is good, otherwise, you may have to add a little more milk to make it spreadable and easy to frost whatever you’re trying to frost.  Add about 1/2 a Tbsp at a time.  Or if you’re trying to make something a little stiffer to create a filling dam or something to that effect, you can always add a little more powdered sugar.

When I’m frosting cakes or cupcakes, this is usually what mine turns out looking like:

OLYMPUS DIGITAL CAMERA

NOW, you can taste it and it tastes oh so heavenly!  I don’t think anyone will even blame you for licking the spoon (just don’t put it back in the bowl!).

And since I now have this delicious batch of homemade fabulous frosting, I’m off to decorate some cakes for this weekend.  And with my cake scrapes I will have my cake AND eat it too of course with some of the frosting 🙂

Today is the day

Image

Today, December 5th, is the day.  The day all my hopes and dreams in life have come true!

Well… maybe not… but it is the day that I’m going to start this awesome blog and takes you on food and fun adventures that you may (or may not) remember for the rest of your life!

My promise to you is that throughout the course of this blog, you will learn something; maybe about yourself, or your family, or even a new recipe that the picky eaters in your family just can’t stop requesting! I have high hopes for this and will try to post often and keep it as entertaining as possible – after all, who wants to read boring stories??  Not I! So here’s to far off adventures (or maybe closer to home adventures) and food that will have you as obsessed with recipes as I am.

Have a great day!